Paint your Wagon
-
Wheeledbeast
- In overdrive
- Posts: 1360
- Joined: Mon Apr 15, 2013 1:41 pm
Re: Paint your Wagon
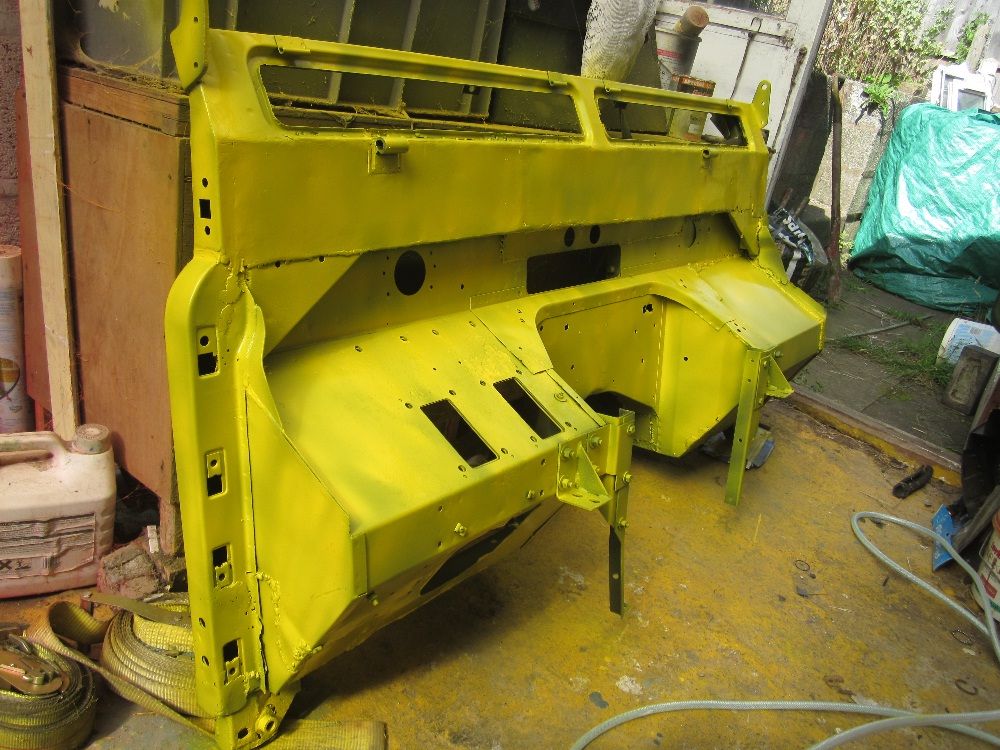
So here is my first attempt at spraying, this is one under coat and one top coat. When I tried to spray under coat I got loads of Cobweb type stuff, I think this was because the paint was far too thick, I thinned it down and it seemed to work much better. The top coat on the other hand was thinned to about 50% with white sprit. This seems far too thin, and did cause runs in places whilst being semi transparent. Still work in progress I’ll let you know how I get on with the next coats. It is quite a difficult shape to spray.
Re: Paint your Wagon
Just for the future
for spraying, white spirit is no good. it takes too long to evaporate and can be full of nasty stuff that can stick around. You need to use proper paint thinners.
On the subject of thickness the enamel that paddocks sell for £13 a litre is perfect for spraying straight out of the can (on a warm day) I knew the suppliers name not long ago - will try and find it for you.
for spraying, white spirit is no good. it takes too long to evaporate and can be full of nasty stuff that can stick around. You need to use proper paint thinners.
On the subject of thickness the enamel that paddocks sell for £13 a litre is perfect for spraying straight out of the can (on a warm day) I knew the suppliers name not long ago - will try and find it for you.
Re: Paint your Wagon
Small tip, yellow and lime green colours are always better when applied over a white base or undercoat. It carries the colour better.
As has been mentioned above white spirit (otherwise sold as sub turps) is fine for alkyd paint, but for effective spraying with enamel you do need the correct thinner, or some means of safely raising the temperature of the product and the part to be painted but beware there is a difference between thinner and gun cleaner, which some unscrupulous retailers will sell to you as being the same......it's not.
With the incorrect thinner/solvent you run a very real risk of solvent entrapment which can result in cracking of the finish(an effect used to good effect in the 70's for custom paint jobs called 'crackle').
Mist coats, up to 50/50 thinner/paint and allow to get tacky before applying the next would be my suggestion on items like bulkheads, but don't try and rush it.
Temperature and relative humidity is also a critical factor in getting an acceptable finish.
G.
As has been mentioned above white spirit (otherwise sold as sub turps) is fine for alkyd paint, but for effective spraying with enamel you do need the correct thinner, or some means of safely raising the temperature of the product and the part to be painted but beware there is a difference between thinner and gun cleaner, which some unscrupulous retailers will sell to you as being the same......it's not.
With the incorrect thinner/solvent you run a very real risk of solvent entrapment which can result in cracking of the finish(an effect used to good effect in the 70's for custom paint jobs called 'crackle').
Mist coats, up to 50/50 thinner/paint and allow to get tacky before applying the next would be my suggestion on items like bulkheads, but don't try and rush it.
Temperature and relative humidity is also a critical factor in getting an acceptable finish.
G.
-
Wheeledbeast
- In overdrive
- Posts: 1360
- Joined: Mon Apr 15, 2013 1:41 pm
Re: Paint your Wagon
Things have ground to a dead halt over the last couple of months as I have been struggling to find the will power to get out in the cold and the dark  Any way I decided that painting the dash board was something I could manage.
I bought some Halfords wrinkle finish spray paint. I know that’s not “correct” but I thought it would match the Smiths heater and might look cool….
Well I was a bit disappointed . The first three coats just came out a sort of semi gloss black, so given the price of the can I was a bit miffed.  Then I thought about what Gramor had said above about temperature, so I sprayed on an extra coat and bought it to dry by the fire. Well it wrinkled up a bit and it looks okay with all the switch gear back in, but I think next time I will just use ordinary black paint.
Any way I decided that painting the dash board was something I could manage.I bought some Halfords wrinkle finish spray paint. I know that’s not “correct” but I thought it would match the Smiths heater and might look cool….
Well I was a bit disappointed
. The first three coats just came out a sort of semi gloss black, so given the price of the can I was a bit miffed. Then I thought about what Gramor had said above about temperature, so I sprayed on an extra coat and bought it to dry by the fire. Well it wrinkled up a bit and it looks okay with all the switch gear back in, but I think next time I will just use ordinary black paint.Re: Paint your Wagon
INTERESTING!
That push button on the right of dash board - Was that the horn button?
Ellie has the same button for horn, but I thought it was a PO job!
That push button on the right of dash board - Was that the horn button?
Ellie has the same button for horn, but I thought it was a PO job!
-
Wheeledbeast
- In overdrive
- Posts: 1360
- Joined: Mon Apr 15, 2013 1:41 pm
Re: Paint your Wagon
That’s the starter button on mine  . I have seen the exact same button on lots of FC photos, always assumed it was the starter on them too, but not sure now
  . My horn is in the centre of the steering Colum.(Doesn’t work, but it’s in the centre of the steering Colum
  )
)
. I have seen the exact same button on lots of FC photos, always assumed it was the starter on them too, but not sure now . My horn is in the centre of the steering Colum.(Doesn’t work, but it’s in the centre of the steering Colum )-
6.2 Diesel
- Low Range
- Posts: 14
- Joined: Tue Nov 13, 2012 11:42 am
Re: Paint your Wagon
My FC has the exact same starter button too, I thought it had been added at a later date until my brother bought a 2a FC and that's got the same starter button in the same place too!
Re: Paint your Wagon
Humm. Elllie starts on the key and the steering wheel centre is solid- no button!
-
DasLandRoverMan
- The 1-Ton Welder
- Posts: 1334
- Joined: Sat Oct 20, 2012 9:33 am
- Location: West Lakes
- Contact:
Re: Paint your Wagon
Bear in mind that Mr Beast, and the Diesel brothers have IIA's, and Ellie is a IIB.
FC's all had a later type remote solenoid (as opposed to the switch on normal control models) and IIB's had the trip on the key, but the button will likely have been needed on the IIA's as the ignition switch wouldn't have facility to trip the solenoid.
Also, it should have the solid 3 spoke wheel as found on later IIA's and III's with the horn push in the centre of the wheel.
Most likely it had a problem with the horn push and it was wired into the button for an MOT.
Doesn't really answer the question as to why it's there. I'll check the IIB's in the yard on Monday and see what's there.
FC's all had a later type remote solenoid (as opposed to the switch on normal control models) and IIB's had the trip on the key, but the button will likely have been needed on the IIA's as the ignition switch wouldn't have facility to trip the solenoid.
Also, it should have the solid 3 spoke wheel as found on later IIA's and III's with the horn push in the centre of the wheel.
Most likely it had a problem with the horn push and it was wired into the button for an MOT.
Doesn't really answer the question as to why it's there. I'll check the IIB's in the yard on Monday and see what's there.
Re: Paint your Wagon
The horn is in the centre of the steering wheel on my 2b.
Who is online
Users browsing this forum: No registered users and 30 guests